Blog

Why Brick & Interlocking Pavers Fade

Brick and interlocking pavers are designed to last for decades, but over time many homeowners notice their once-rich colors turning dull, chalky, or uneven. Fading pavers don’t just affect curb appeal — they’re often an early warning sign of deeper surface wear and structural issues.

Understanding why pavers fade makes it easier to see how professional restoration can dramatically revive them.

The Real Reasons Pavers Lose Their Color

UV Exposure and Oxidation

Sunlight is one of the biggest enemies of brick and concrete pavers. Constant UV exposure breaks down pigments and oxidizes the surface, slowly stripping away the deep reds, browns, and charcoals that once made your patio or driveway stand out.

Over time, this oxidation creates a washed-out, dusty appearance that regular rinsing can’t fix.

Efflorescence: The White Haze Problem

Efflorescence appears as a white or gray powdery residue on paver surfaces. It forms when moisture moves through the paver and brings salts to the surface, where they crystallize as the water evaporates.

While efflorescence isn’t structural damage, it masks color, makes pavers look faded, and often returns if it’s not treated correctly.

Joint Sand Loss and Surface Erosion

The sand between pavers does more than keep them in place. When joint sand washes out from rain, sprinklers, or pressure washing, pavers shift slightly. This movement causes surface abrasion, edge wear, and accelerated fading.

Once the joints weaken, color loss speeds up — and weeds and ants usually follow.

Dirt, Algae, and Embedded Contaminants

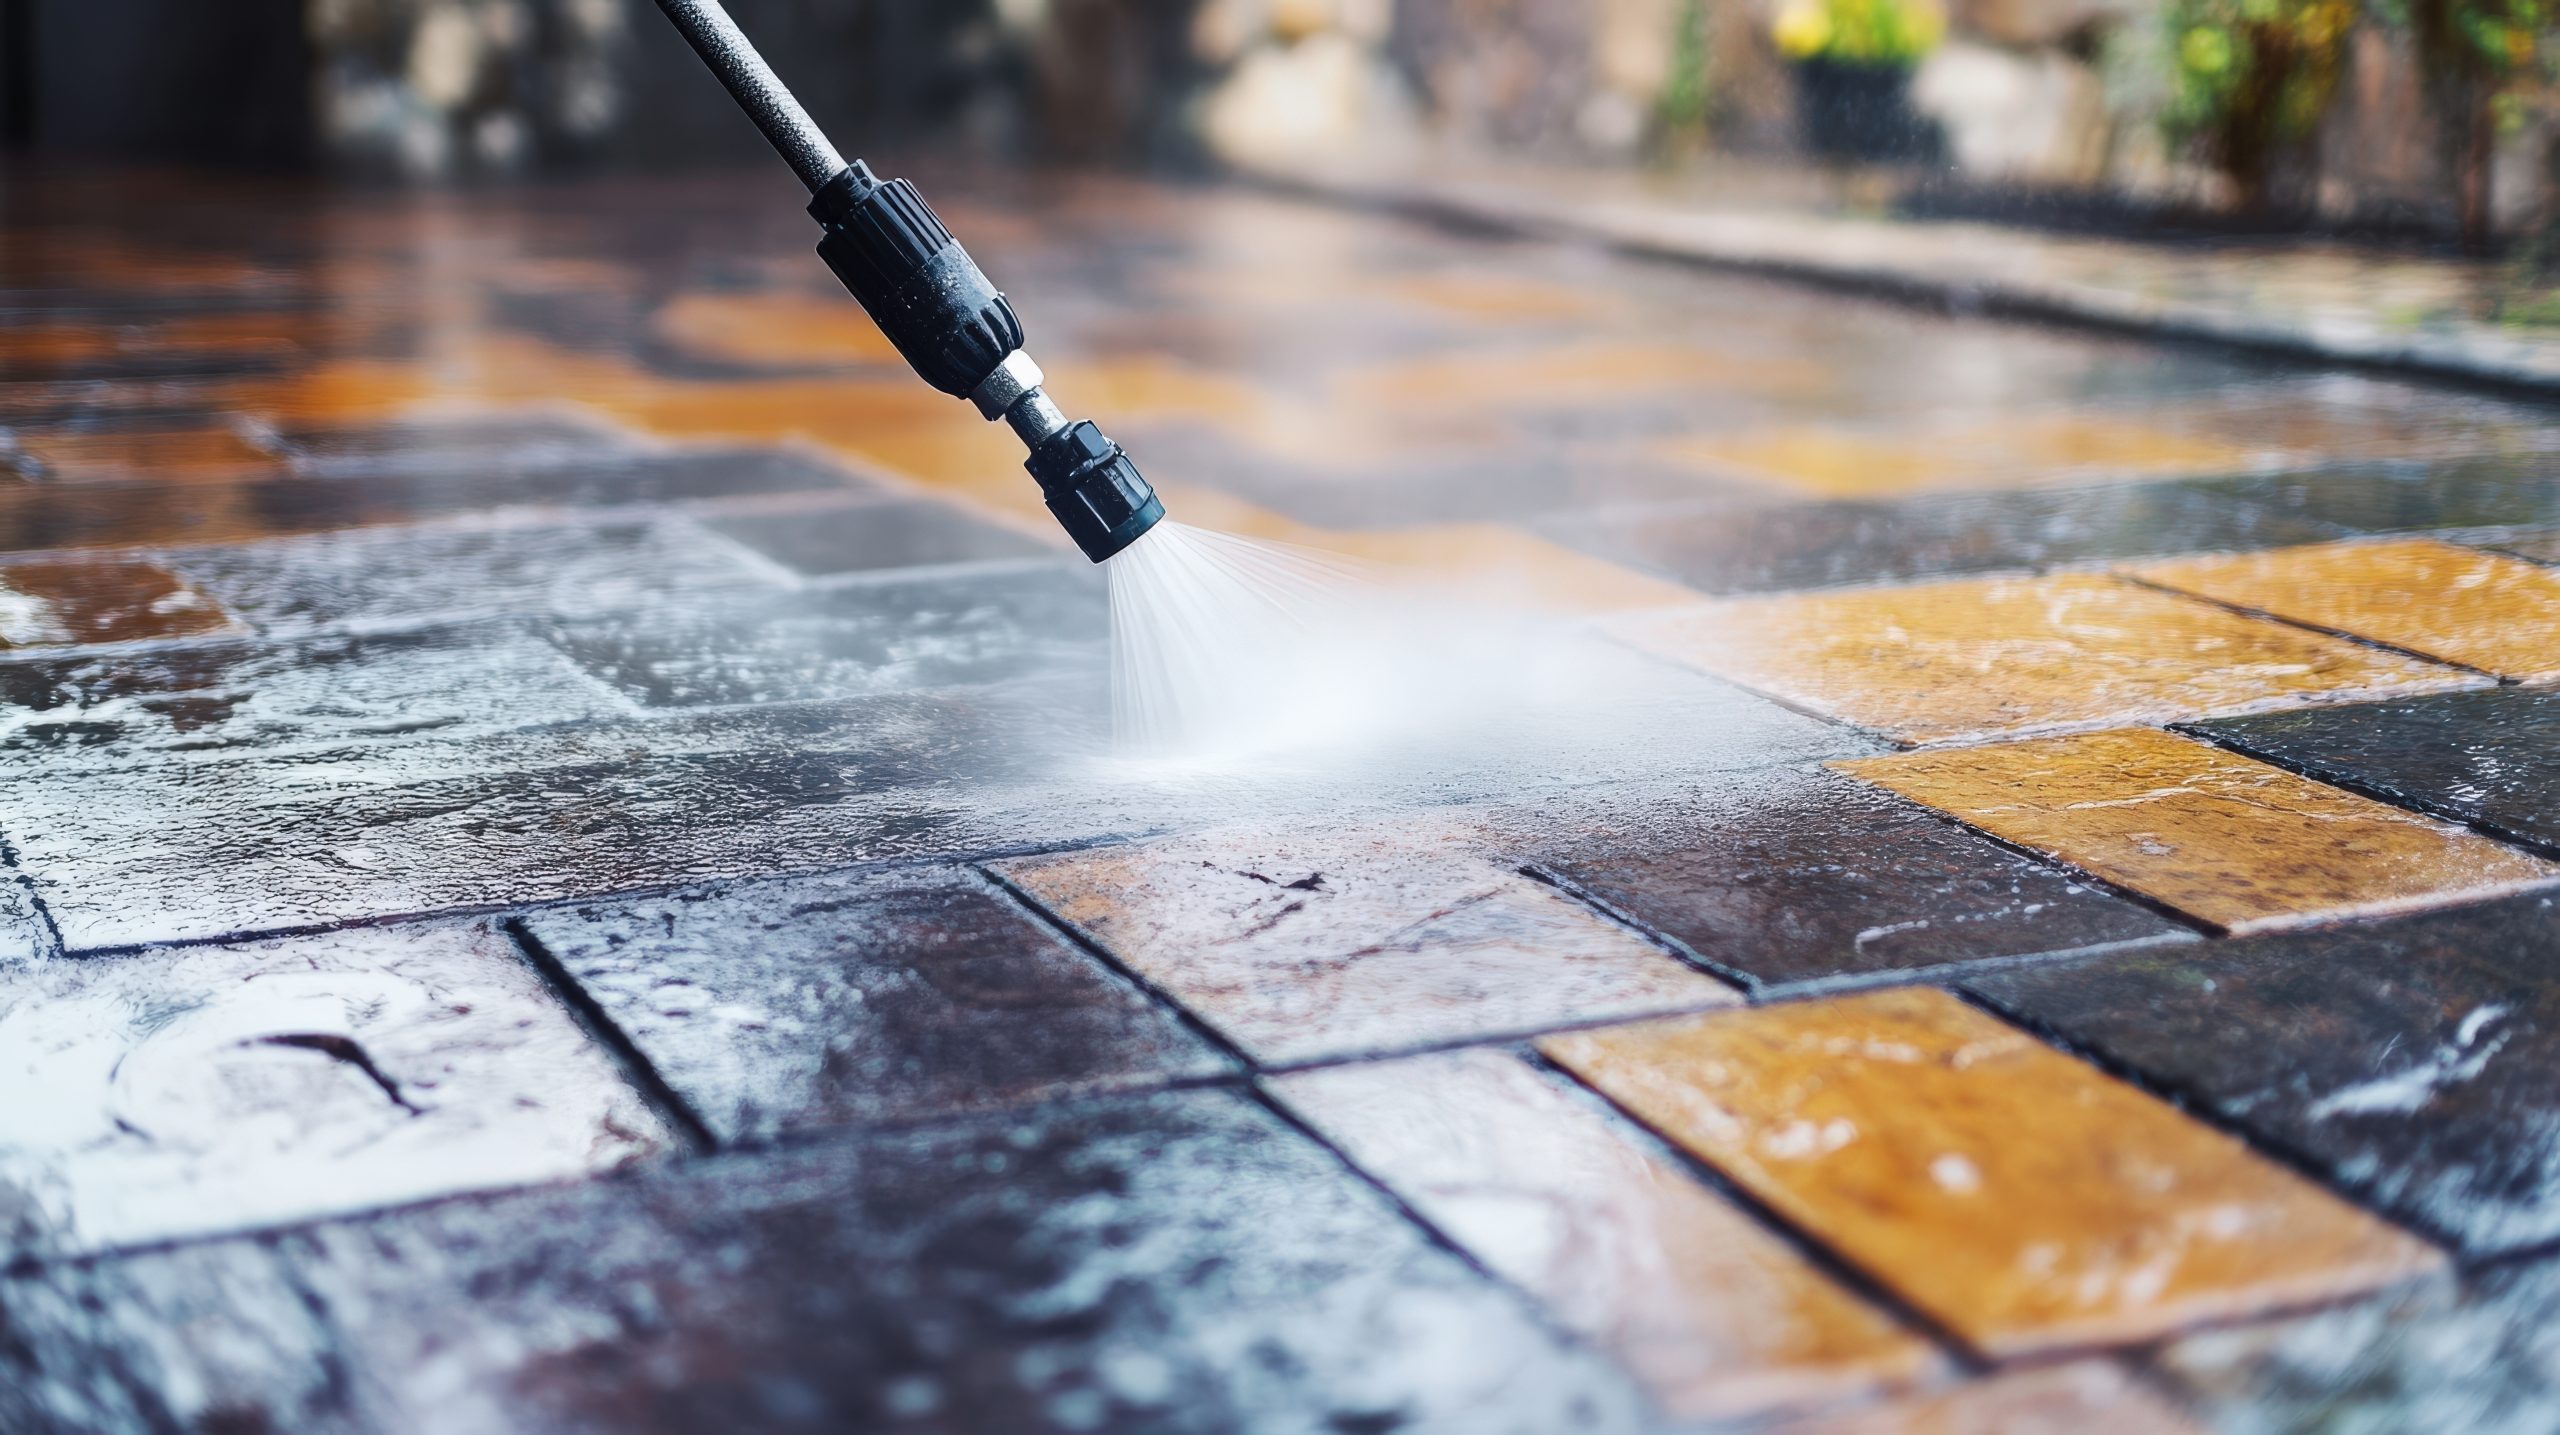
Pavers are porous by nature. Over time they absorb dirt, oils, mildew, and organic growth that dull the surface and hide the original color. Standard pressure washing often pushes these contaminants deeper instead of removing them.

How Professional Paver Restoration Brings Color Back

Deep Cleaning That Goes Beyond Pressure Washing

Professional restoration starts with specialized cleaners that break down oxidation, organic growth, and efflorescence without damaging the paver surface. This controlled cleaning reveals the true color beneath years of buildup.

Re-sanding the Joints for Stability

After cleaning, fresh joint sand is installed and compacted between the pavers. This restores structural integrity, prevents shifting, and protects edges from further wear — a crucial step that DIY cleaning often skips.

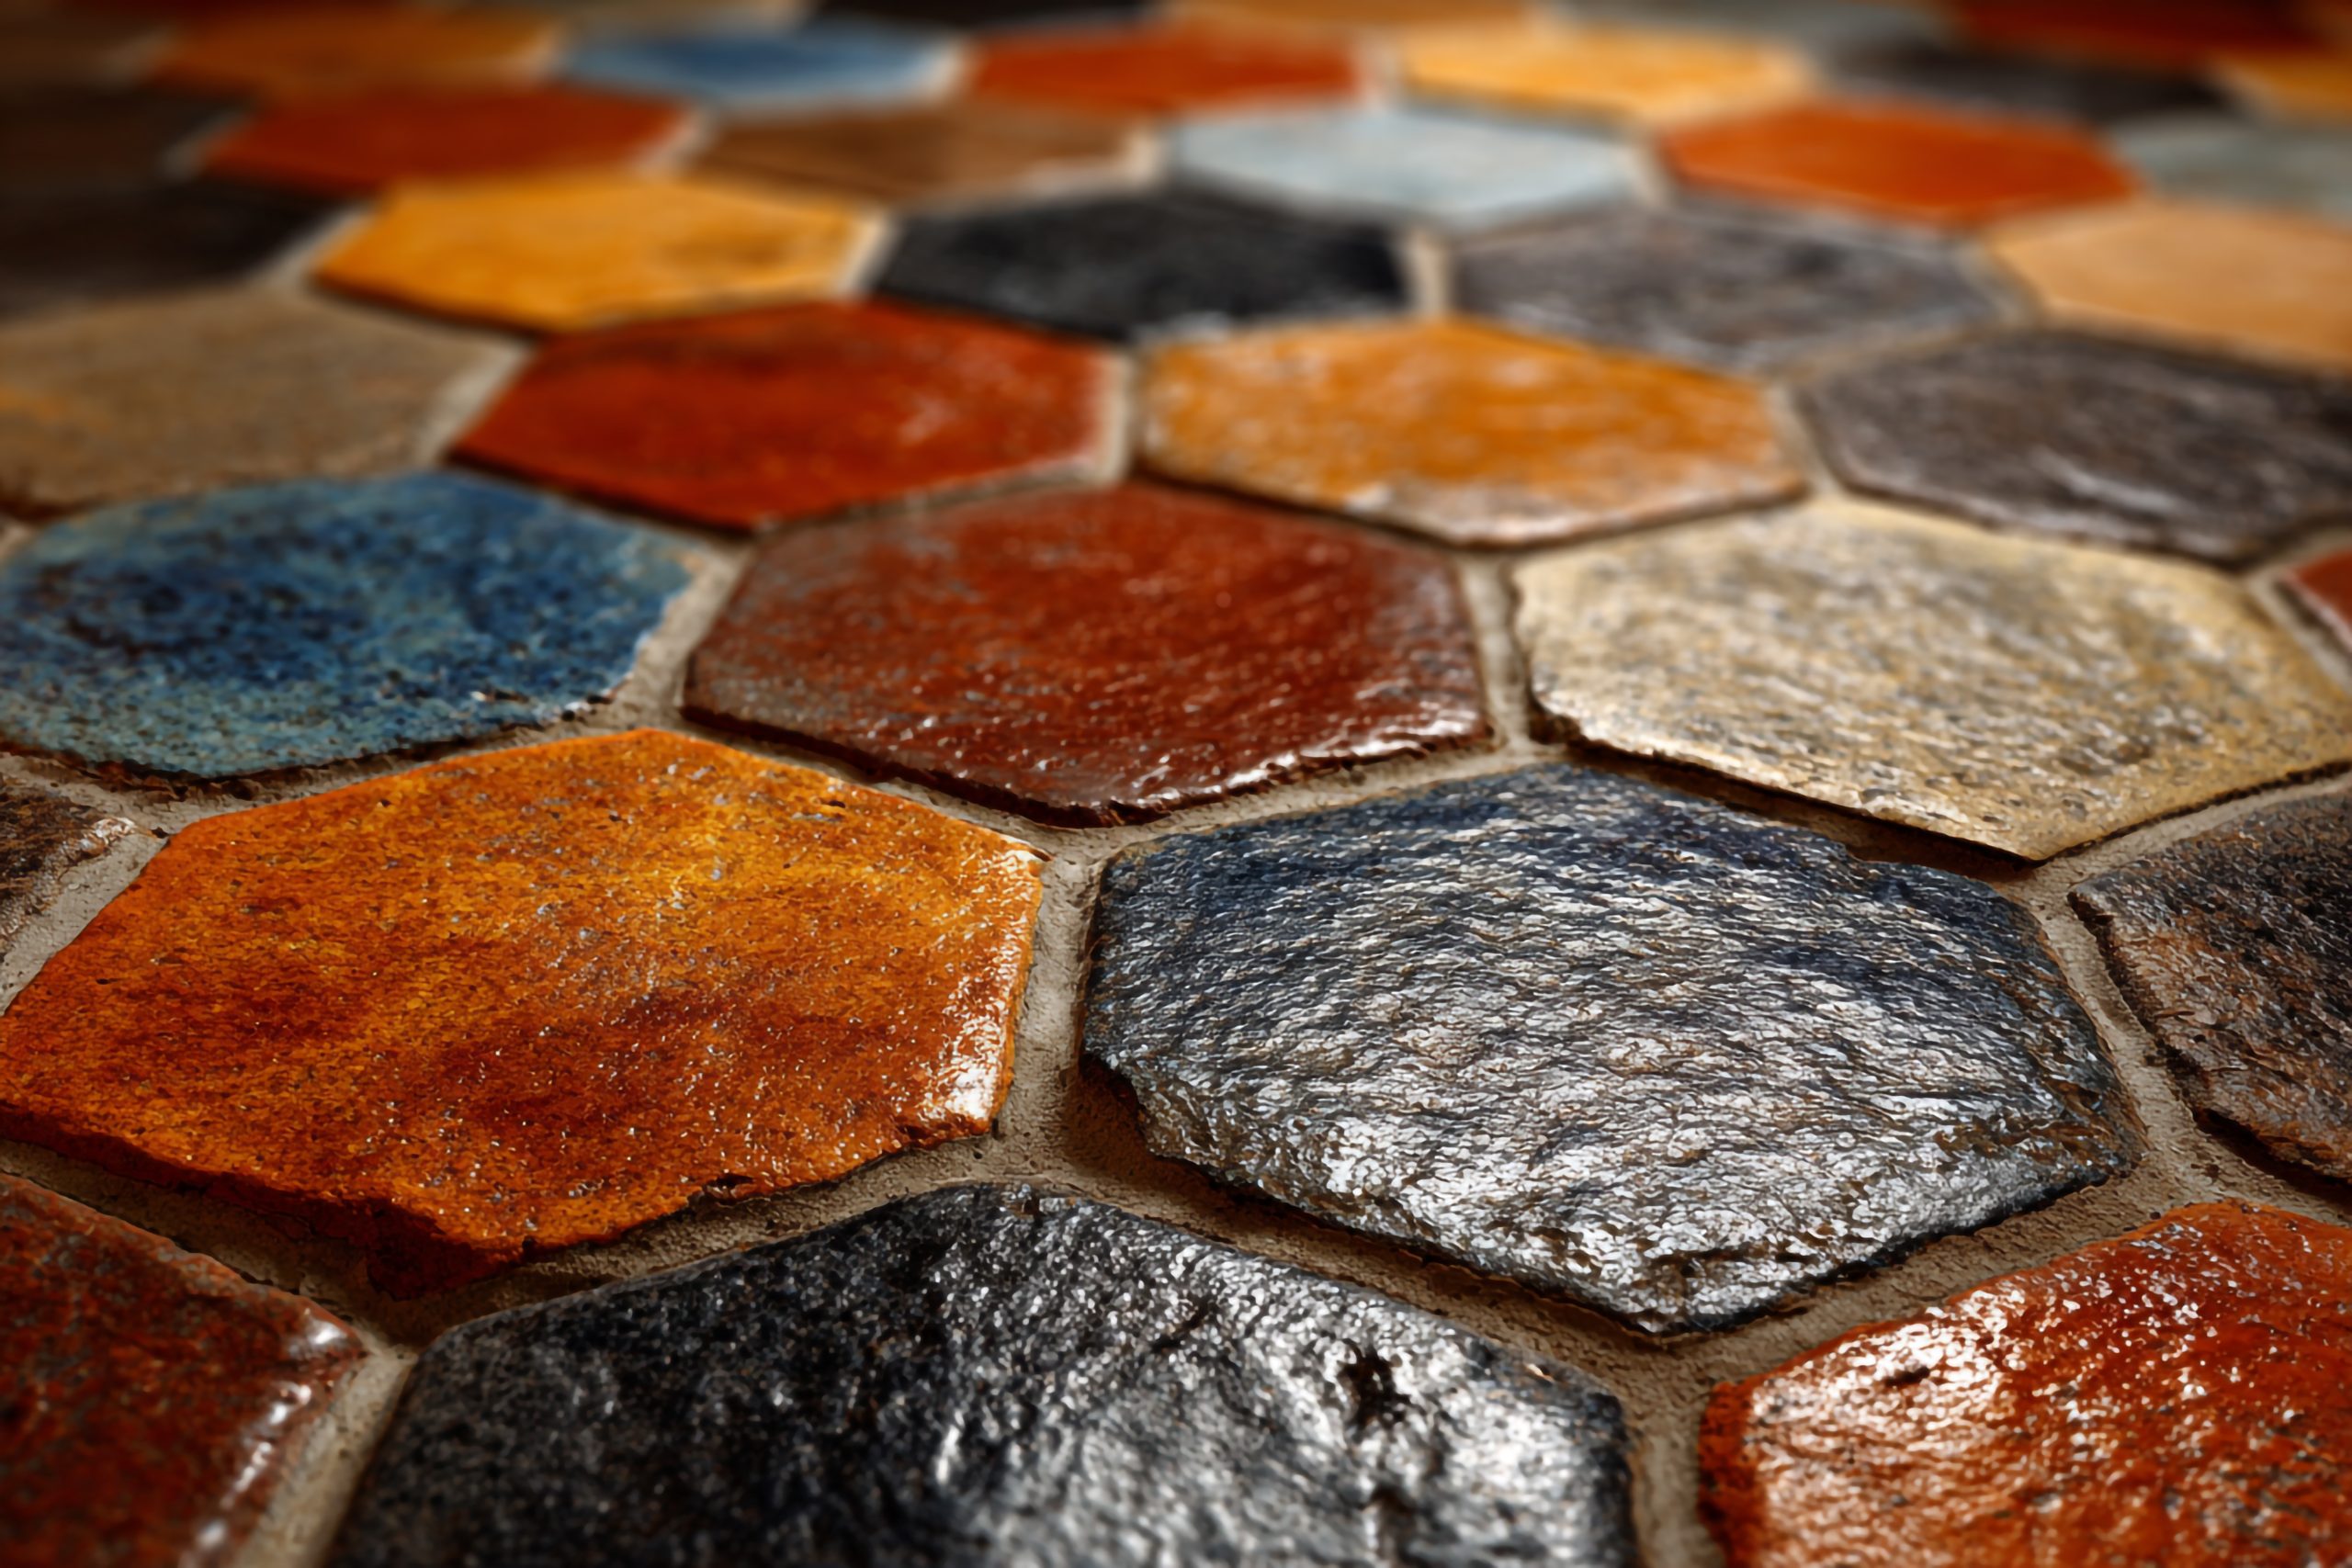
Sealing: The Key to Long-Term Color Restoration

High-quality paver sealers do more than add shine. They:

  • Enhance natural color tones
  • Block UV rays that cause fading
  • Reduce moisture penetration
  • Lock joint sand in place
  • Make future cleaning easier

Depending on the finish, sealers can restore a natural matte look or add a rich, wet appearance that dramatically transforms faded surfaces.

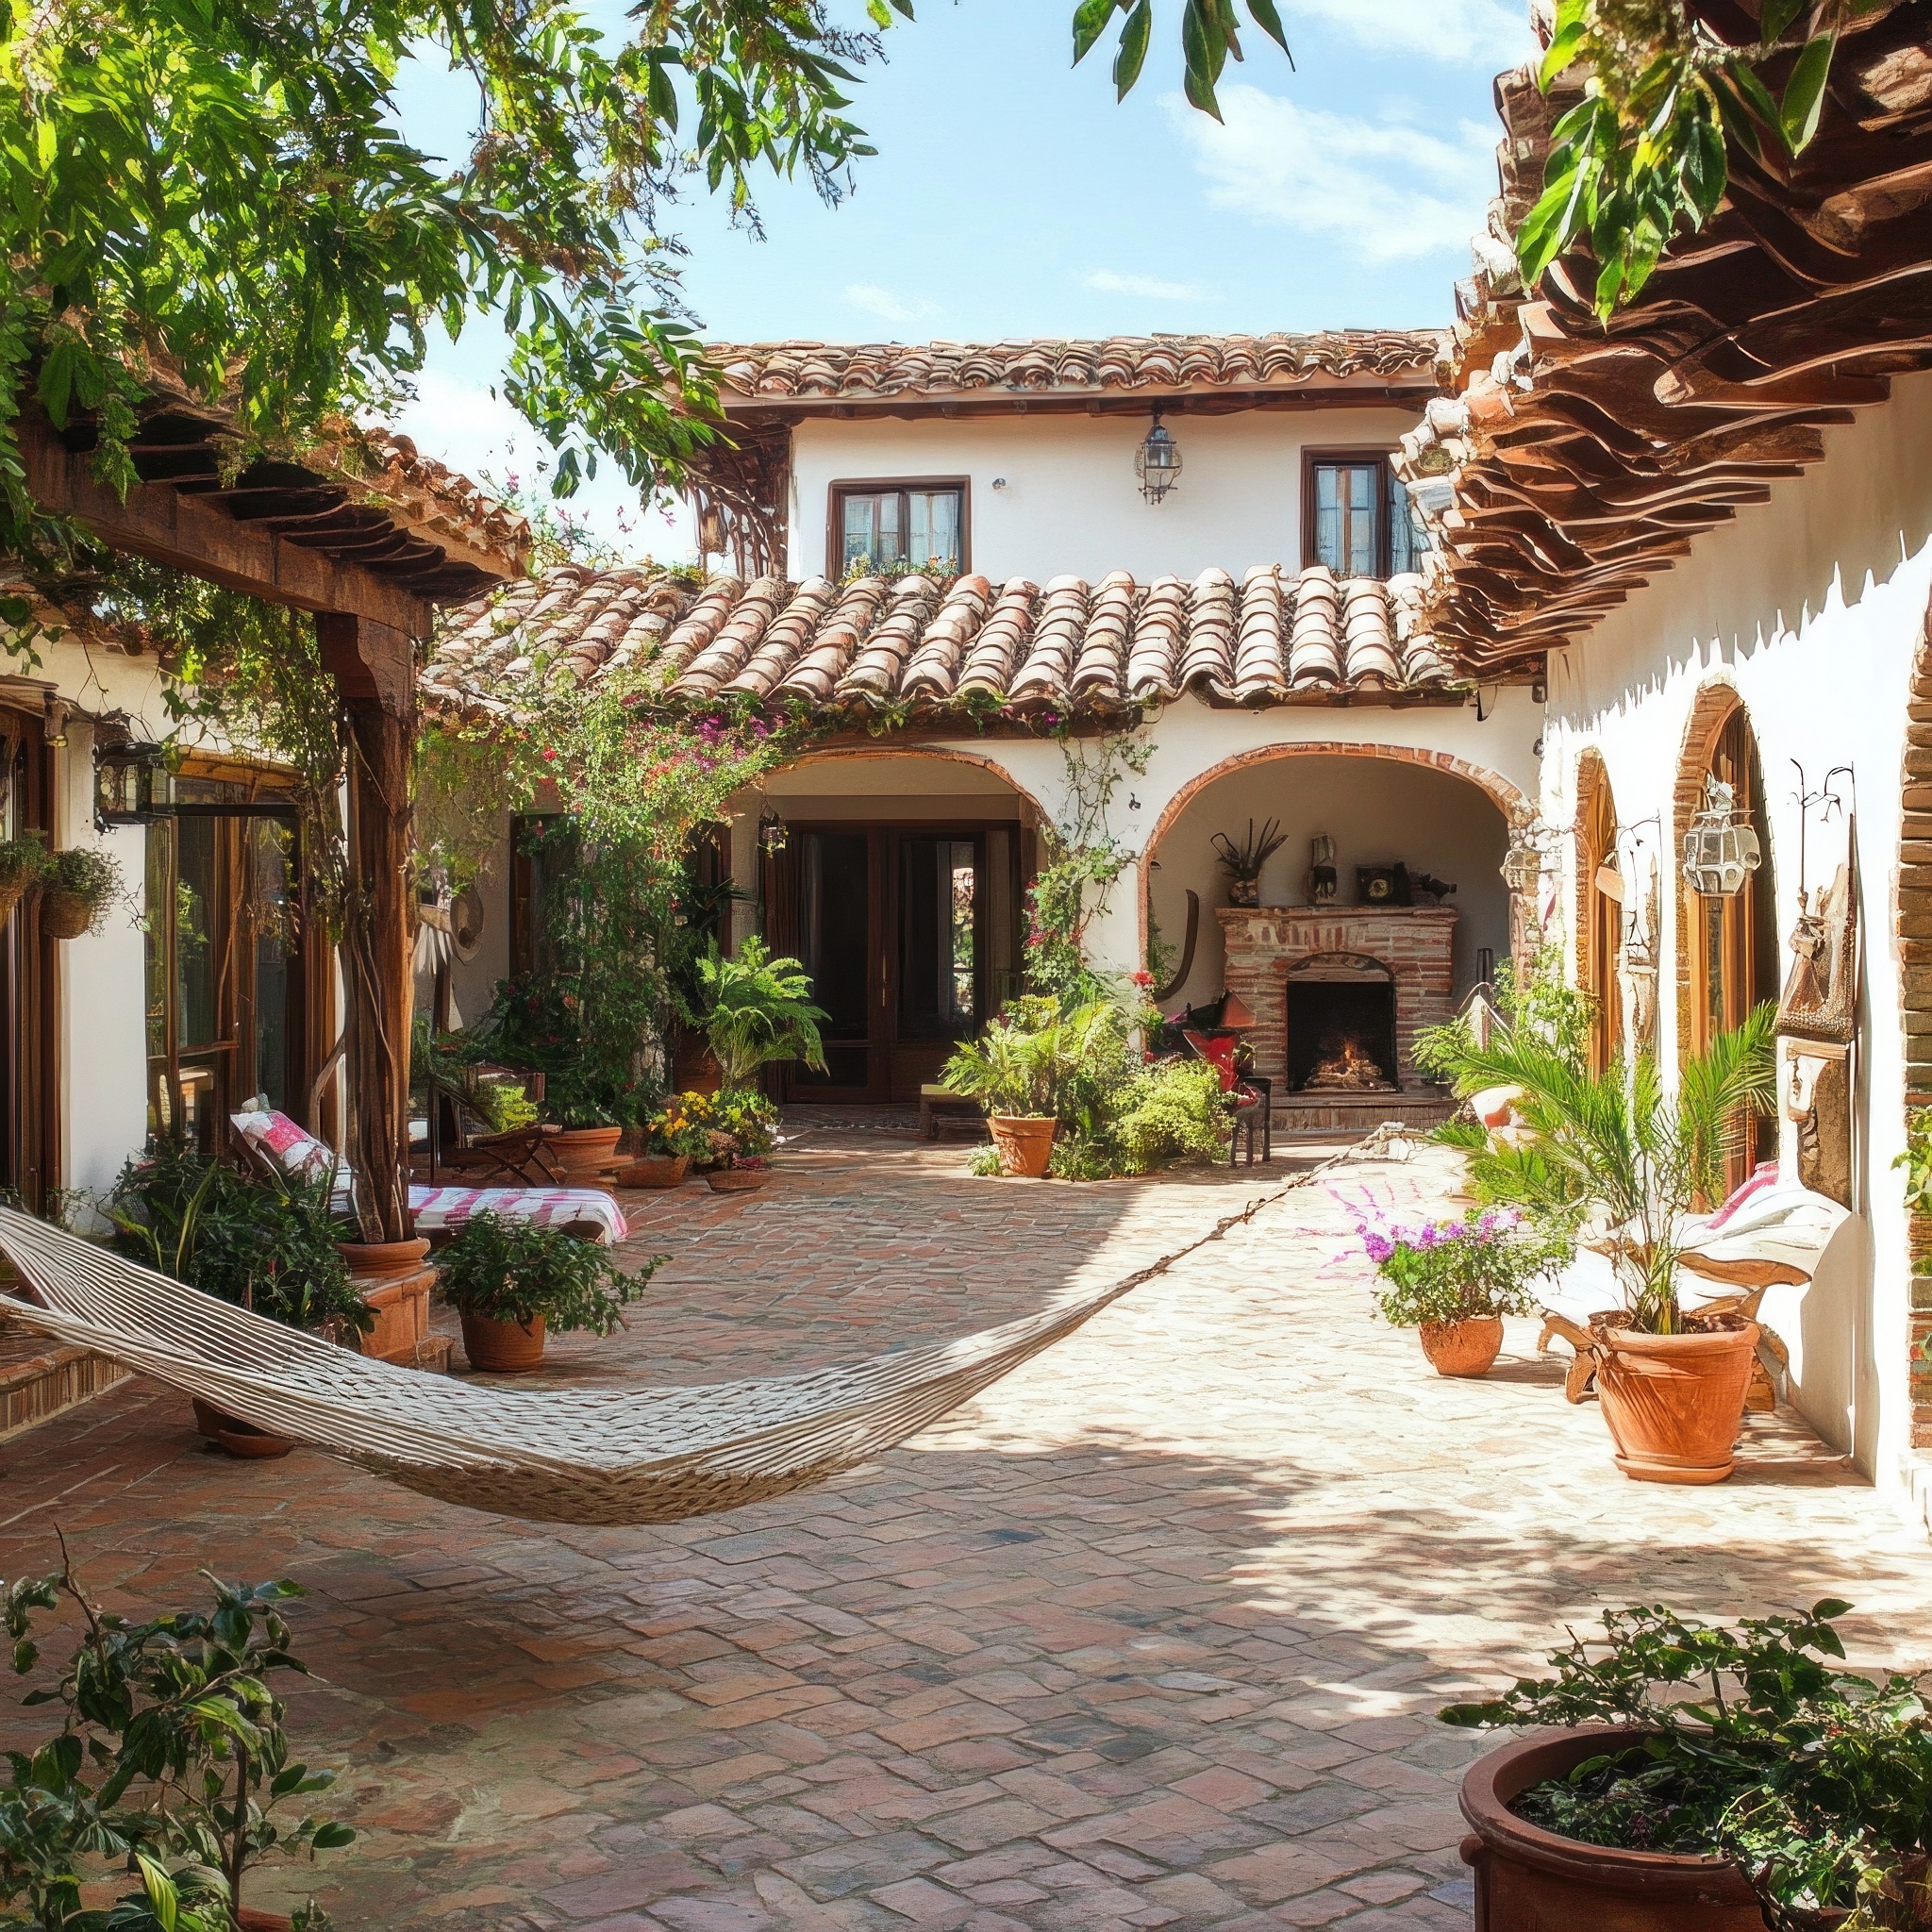
Before-and-After: What Restoration Really Does

Proper paver restoration doesn’t just “clean” the surface — it reverses years of visible aging. Homeowners are often surprised to see colors they thought were permanently gone return after professional treatment.

Driveways look newer, patios feel refreshed, and walkways regain definition — all without the cost of replacement.

Don’t Refloor, Restore

Faded brick and interlocking pavers don’t mean it’s time for demolition. In most cases, professional cleaning and sealing can restore color, protect the surface, and extend the life of your pavers for many years.

If your outdoor surfaces look tired, restoration is one of the highest-impact improvements you can make to your home’s exterior.

Professional vs. DIY Saltillo Tile Cleaning: When to Call an Expert

Saltillo tile brings warmth, texture, and old-world charm to a home—but it also requires specialized care. Homeowners often ask whether DIY Saltillo tile cleaning is enough or if professional Saltillo tile restoration is worth the investment. The answer depends on the tile’s condition, how it was sealed, and the results you expect.

Below is a clear, side-by-side look at results, risks, and costs to help you decide when to handle it yourself and when to call an expert.

Understanding Saltillo Tile (Why It’s Different)

Saltillo tiles are handmade, highly porous clay tiles. Unlike ceramic or porcelain, they:

  • Absorb liquids and cleaners quickly
  • Are easily etched by acids and harsh chemicals
  • Depend heavily on proper sealing for protection

Because of this, mistakes during cleaning or sealing can cause permanent damage, not just cosmetic issues.

DIY Saltillo Tile Cleaning: What You Can (and Can’t) Do

What DIY Cleaning Does Well

DIY cleaning can work when the tile is in good condition and the goal is light maintenance.

Best for:

  • Routine dust and surface dirt
  • Recently sealed tile
  • Mild stains caught early
  • Small areas like kitchens or entryways

Typical DIY tools:

  • pH-neutral tile cleaner
  • Soft mop or microfiber pad
  • Soft-bristle brush
  • Clean water for frequent rinsing

Limitations of DIY Cleaning

DIY methods cannot:

  • Remove deep oil or pet stains
  • Correct uneven or failing sealers
  • Restore faded color or sheen
  • Remove wax buildup or efflorescence safely

Once contaminants penetrate unsealed or worn tile, surface cleaning won’t reach the problem.

DIY Risks to Watch For

  • Using vinegar, bleach, or acidic cleaners
  • Over-wetting porous tiles
  • Leaving cleaner residue behind
  • Scrubbing with stiff brushes or pads

These mistakes often lead to chalky residue, dark blotches, peeling sealers, or crumbling edges.

Professional Saltillo Tile Restoration: What Experts Do Differently

Professional services go far beyond basic cleaning.

What Professionals Bring

  • Commercial-grade low-pressure extractors
  • Tile-safe alkaline and solvent cleaners
  • Moisture-controlled rinsing systems
  • Proper breathable sealers (penetrating or topical)

This allows technicians to clean deep into the tile body without saturating or damaging it.

What Professionals Can Fix

  • Deep oil, grease, and pet stains
  • Efflorescence (white mineral deposits)
  • Old wax or acrylic buildup
  • Uneven sheen and faded color
  • Failed or improperly applied sealers

In many cases, professional restoration can make tile look near-new without replacement.

Results Comparison: DIY vs. Professional

DIY Results

  • Cleaner surface appearance
  • Limited stain removal
  • No structural or finish correction
  • Often short-lived results

Professional Results

  • Deep, uniform cleaning
  • Color revitalization
  • Proper resealing for long-term protection
  • Results that last years, not months

If your tile still looks dull, patchy, or stained after DIY attempts, that’s a sign surface cleaning isn’t enough.

Cost Comparison: Short-Term vs. Long-Term

DIY Costs

  • Cleaners and tools: low upfront cost
  • Time investment: moderate to high
  • Risk of costly mistakes: high

Repeated DIY attempts or accidental damage often lead to higher long-term costs.

Professional Costs

  • Higher upfront price
  • Includes cleaning, restoration, and sealing
  • Extends tile life significantly

In many cases, professional restoration costs far less than tile replacement, especially for large areas.

When DIY Makes Sense

DIY Saltillo tile cleaning is appropriate when:

  • Tile is evenly sealed and in good shape
  • Dirt is light and surface-level
  • You’re performing routine maintenance
  • You understand which cleaners are tile-safe

When to Call a Professional

Professional Saltillo tile restoration is the better choice when:

  • Stains are dark, oily, or widespread
  • Tile looks blotchy or uneven after cleaning
  • Sealer is peeling, sticky, or worn through
  • Efflorescence keeps returning
  • You want long-term protection, not a temporary fix

DIY Saltillo tile cleaning can help maintain healthy floors—but it has clear limits. When stains run deep or sealers fail, professional Saltillo tile restoration delivers safer cleaning, better results, and longer-lasting protection.

If your Saltillo tile no longer responds to gentle cleaning, calling an expert isn’t an expense—it’s an investment in preserving one of your home’s most distinctive features.

The Cost of Neglect: What Happens When You Don’t Maintain Saltillo Tile

Saltillo tile stands out for its beauty and unmistakable handcrafted character. But without routine cleaning, sealing, and protective care, Saltillo is also one of the easiest surfaces to damage. Homeowners often don’t realize that neglected Saltillo tile doesn’t just lose shine — it deteriorates structurally, becomes more expensive to restore, and in severe cases requires full replacement.

Below is what actually happens when Saltillo goes unmaintained and why consistent care is far cheaper than repairs.

What Happens When You Neglect Saltillo Tile

Crumbling Edges and Surface Erosion

Saltillo is a handmade, low-fire clay tile. It’s naturally porous and softer than ceramic or porcelain.
When it’s left unsealed or the sealer wears off:

  • Edges begin to chip and crumble, especially in high-traffic areas.
  • Clay dust appears around the tile, indicating active erosion.
  • Small dings become larger breaks that trap soil and moisture.

Long-term outcome: Deep structural erosion that can’t be repaired with cleaning or resealing. Tiles may need to be replaced individually — or in large sections.

Dull, Scratched, and Uneven Finish

Without fresh sealer, Saltillo loses its signature warm sheen and begins to look:

  • Chalky or cloudy
  • Deeply scratched
  • Patchy and uneven in color

Because Saltillo absorbs everything (dirt, oils, mop water), the finish becomes permanently stained unless professionally stripped and restored.

Long-term outcome:
A full strip and refinish service becomes necessary, which is significantly more expensive than routine sealing.

Efflorescence: The White Powder Problem

Efflorescence happens when moisture moves through the tile and brings minerals to the surface. Neglected Saltillo — especially in kitchens, entries, and outdoor areas — is highly vulnerable.

Signs include:

  • White, crusty mineral deposits
  • Flaking sealer
  • Bubbled or peeling finish
  • Persistent hazy film no matter how much you clean

Long-term outcome:
Efflorescence can permanently discolor Saltillo and damage the sealer from the inside out. Severe cases require professional moisture mitigation and complete resealing.

Moisture Penetration and Staining

When a Saltillo sealer breaks down:

  • Spills soak in instantly
  • Grease leaves dark, permanent patches
  • Water causes soft spots or expansion
  • Pet accidents leave deep odor-trapping stains

Because raw Saltillo functions like a sponge, these stains cannot be removed with DIY methods.

Long-term outcome:
Tile becomes unstable or discolored beyond repair, leading to tile replacement rather than restoration.

Higher Replacement Costs Later

Neglecting Saltillo tile for years doesn’t save money — it multiplies costs.

Typical cost comparison:

Service TypeWhat It IncludesApprox. Cost Range*
Routine MaintenanceLight cleaning + reseal$1–$2.50 / sq ft
Deep RestorationStrip, deep clean, repair, heavy reseal$4–$8 / sq ft
Tile ReplacementRemove damaged tiles + install new Saltillo + finish$15–$35 / sq ft

*Costs vary by region and tile condition.

Saltillo maintenance cost vs replacement:
Routine sealing every 2–3 years keeps Saltillo protected and beautiful for decades. Neglect can turn a simple $300–$800 maintenance visit into a $4,000+ restoration or an even larger replacement job.

Why Regular Maintenance Saves You Thousands

Saltillo isn’t meant to be high-maintenance — it just needs predictable care:

  • Regular cleaning with pH-neutral products
  • Resealing every 2–3 years
  • Occasional touch-up coats on high-traffic spots
  • Immediate cleanup of spills and stains

A properly maintained Saltillo floor can last 50+ years.
A neglected one can fail in as little as 5–10.

Routine care prevents:

  • Moisture intrusion
  • Structural damage
  • Permanent stains
  • Costly tile replacement
  • Unsafe flooring (loose or hollow tiles)

Think of Saltillo maintenance as protecting an investment — not just preserving looks.

When to Call a Saltillo Damage Repair Professional

You should schedule an inspection if you notice:

  • Crumbling edges or loose tiles
  • Disappearing shine
  • White chalky residue (efflorescence)
  • Sticky or flaking sealer
  • Dark stains that don’t lift
  • Tiles that look “thirsty” or dry

Early intervention keeps restoration affordable and prevents replacement.

Neglect Is Expensive — Maintenance Isn’t

Saltillo tile delivers timeless beauty, warmth, and character. But because it’s porous and handmade, it’s vulnerable when ignored. A simple maintenance schedule protects the tile, preserves its finish, and avoids costly damage repair or full replacement.

If you’re weighing Saltillo tile maintenance cost vs replacement, the math is clear:
Spend a little now, or spend a lot later.

Deep Cleaning Saltillo Tile Grout: Restoring the Lines Without Damage

Saltillo tile brings warmth and character to any space, but its beauty depends heavily on the condition of the grout lines. Over time, clay tile grout can darken, trap dirt, and even deteriorate if it’s not properly maintained. Deep cleaning Saltillo tile grout requires patience, the right products, and a gentle touch to preserve both the tiles and the integrity of the joints.

Understanding Saltillo Grout Challenges

Unlike ceramic or porcelain tiles, Saltillo is a handmade, porous clay tile. Its irregular edges and absorbent surface mean grout lines are typically wider, more textured, and more susceptible to buildup. Common problems include:

  • Dirt and grease accumulation: Especially in kitchens and entryways, unsealed grout can absorb grime, leading to discoloration.
  • Uneven color tones: Older installations may show mismatched or faded grout from sun exposure or previous cleaning chemicals.
  • Cracking or erosion: Acidic cleaners or excessive moisture can break down traditional cement-based grout over time.

Addressing these issues requires more than a quick mop — it’s about deep restoration without harming the surrounding clay.

Step 1: Prep and Protection

Before cleaning, protect your Saltillo tiles and surrounding areas:

  1. Vacuum and dry sweep to remove loose debris.
  2. Mask edges with painter’s tape if using any liquid cleaner near tile borders.
  3. Test all products in a small, hidden spot to confirm they won’t lighten or etch the tile.

For older floors, it’s wise to check whether the grout is sealed. If water darkens the lines immediately, the sealant has worn off and cleaning will need to be extra gentle.

Step 2: Choosing the Best Grout Cleaner for Clay Tiles

Avoid harsh acids and bleach-based products, which can etch or discolor Saltillo. Instead, opt for:

  • Alkaline grout cleaners (pH 8–10): These break down oils and organic buildup safely.
  • Oxygenated cleaners: A gentle, eco-friendly option that lifts embedded stains without damaging clay.
  • Homemade mixture: Combine warm water, a few drops of mild dish soap, and baking soda paste for spot cleaning.

If you need something stronger, look for a neutral pH cleaner specifically labeled for natural clay or terracotta tile. Products like Aqua Mix Heavy-Duty Tile & Grout Cleaner or StoneTech KlenzAll are industry favorites for Saltillo care.

Step 3: Gentle Agitation and Rinse

Once you’ve applied your chosen cleaner, let it dwell for 5–10 minutes to loosen grime. Then:

  1. Scrub gently with a soft-bristle brush or nylon grout brush. Avoid steel wool or stiff wire tools.
  2. Work in small sections to prevent the cleaner from drying.
  3. Rinse thoroughly with clean water and extract residue using a wet vacuum or microfiber towel.

Repeat the process on stubborn areas rather than increasing chemical strength — gradual cleaning preserves the tile’s finish.

Step 4: Grout Color Matching and Repair

If your grout lines are permanently stained or eroded, cleaning alone may not restore a uniform look. You can:

  • Use a grout colorant or stain to even out color tones. Choose a shade that complements your Saltillo’s natural variations (warm beige, tan, or soft gray).
  • Regrout problem areas using a flexible, polymer-modified grout designed for wider joints.
  • Avoid bright white grouts — they tend to discolor quickly against clay tile.

Matching grout to the mid-tone of your Saltillo tiles creates a more natural, cohesive appearance and hides future wear better than light or dark extremes.

Step 5: Sealing for Longevity

Once the grout is fully clean and dry, reseal it to prevent future buildup and staining. Choose a penetrating sealer that’s safe for both clay and cementitious materials. Apply it evenly with a foam brush or applicator bottle, and wipe away any excess from the tiles.

For best results:

  • Reapply sealer every 1–2 years in high-traffic areas.
  • Maintain regularly with neutral pH cleaners only.
  • Avoid steam mops and acidic products, which can break down the sealer prematurely.

Deep cleaning Saltillo tile grout is a careful process of restoration, not just scrubbing. With the right approach — gentle cleaners, soft brushes, color-matched repairs, and quality sealants — you can restore the crisp lines that define your handmade clay tiles and protect them for decades to come.

Whether your floor is newly installed or decades old, treating grout as part of the tile’s overall ecosystem ensures that both stay beautiful, authentic, and durable.

Outdoor Saltillo Tile Care: Protecting Patios from Rain, Sun, and Stains

Known for their handcrafted texture and sunbaked hues, Saltillo tile patios bring a sense of rustic warmth and timeless appeal to any outdoor space. Made from natural Mexican clay and fired in open kilns, these handmade tiles create a stunning, earthy look that enhances any outdoor space. However, Saltillo’s beauty comes with a catch — it’s extremely porous and sensitive to the elements. Without proper care, exposure to rain, sun, and stains can quickly deteriorate the finish and cause discoloration, erosion, or cracking.

Here’s how to keep your outdoor Saltillo patio looking beautiful year after year with the right sealing, cleaning, and maintenance techniques.

How Weather Affects Saltillo Tile

1. Rain and Moisture:
Saltillo’s porous surface absorbs water easily. When moisture seeps into the clay, it can lead to efflorescence (a white chalky residue), mildew growth, or even cracking during freeze–thaw cycles. Prolonged moisture also weakens the bond between the tile and the setting bed, causing loose or shifting tiles.

2. Sun and UV Exposure:
Direct sunlight fades the rich terracotta tones that make Saltillo so appealing. UV exposure can also dry out sealers prematurely, leaving tiles vulnerable to cracking and chalking.

3. Stains and Organic Matter:
Outdoor patios often encounter spills from food, drinks, or plant material. Because unsealed Saltillo acts like a sponge, stains can quickly penetrate the surface and become permanent if not sealed or cleaned properly.

Proper Sealing for UV and Moisture Protection

Sealing is the most important step in preserving outdoor Saltillo tile. The right sealer not only prevents water and stains from soaking in but also protects against fading and UV damage.

1. Choose the Right Sealer Type:

  • Penetrating Sealers: Absorb into the tile to provide invisible protection without altering the natural look. Great for moisture resistance but limited UV protection.
  • Topical Sealers: Create a glossy or satin film on the surface that enhances color and provides better UV and stain resistance — ideal for outdoor patios.
  • Hybrid Sealers: Combine the benefits of both, offering moisture resistance, UV protection, and easier maintenance.

2. Application Tips:

  • Always clean tiles thoroughly and allow them to dry for at least 24–48 hours before sealing.
  • Apply multiple thin coats rather than one thick layer for even coverage.
  • Reapply sealer every 1–2 years, or sooner if the finish begins to dull or water no longer beads on the surface.

3. Don’t Forget the Grout:
Grout lines are just as porous as the tile itself. Use the same sealer on grout to prevent water intrusion and staining.

Seasonal Maintenance Tips for Outdoor Saltillo Patios

Spring:
Inspect for winter damage, cracks, or efflorescence. Clean with a neutral pH tile cleaner and reseal if needed.

Summer:
Sweep or rinse regularly to remove dust and debris. Avoid acidic or harsh cleaners, which can strip sealers.

Fall:
Before rainy or cold seasons, deep clean and reapply sealer to create a protective barrier. Ensure drainage is clear to prevent standing water.

Winter:
If you live in a freezing climate, cover the patio when possible to avoid moisture absorption and frost damage. Avoid using salt or chemical deicers — they can etch and discolor the tiles.

Outdoor Saltillo tile care comes down to consistency: clean gently, seal regularly, and protect from prolonged exposure to moisture and sunlight. With proper maintenance, your Saltillo patio can last for decades, maintaining its warm, inviting character through every season.

By following these tips for outdoor Saltillo tile care and Saltillo patio cleaning and sealing, you’ll preserve not only the look of your space but also the integrity of the tiles themselves — ensuring your patio remains a vibrant focal point for years to come.

How to Clean Saltillo Tile Without Damaging the Finish

Saltillo tile, handcrafted from natural clay and fired under the warm Mexican sun, brings rustic elegance and earthy character to any home. Yet its charm comes with one major caveat: it’s extremely porous. That means Saltillo easily absorbs water, oils, and cleaning solutions—so one wrong cleaner can strip away its protective finish or cause permanent stains.

To preserve its beauty, Saltillo needs gentle, balanced care with pH-neutral products designed for natural stone and sealed surfaces.

Why You Should Never Use Vinegar, Bleach, or Harsh Cleaners

Common household cleaners can do more harm than good on Saltillo. While vinegar, bleach, or ammonia might seem like powerful cleaning agents, they can quickly eat through the tile’s sealant and damage its surface.

  • Vinegar and acids dissolve the protective sealer and etch the clay surface.
  • Bleach and ammonia discolor the tile and can cause uneven fading.
  • Steam cleaning or excessive water can lead to efflorescence (white powdery residue) or loosen tiles from the subfloor.

Once the sealer is gone, dirt and grime soak into the clay, dulling its natural glow and making deep cleaning nearly impossible.

The Best Cleaner for Saltillo Floors: Stick to Neutral pH

The best cleaner for Saltillo floors is always a neutral pH cleaner made for natural stone or sealed clay tiles. These gentle formulas lift dirt and oils without harming the finish or altering the tile’s tone.

What to Use:

  • Neutral pH cleaner labeled safe for stone, clay, or sealed surfaces
  • Diluted with warm (not hot) water per product instructions
  • Applied with a soft mop or microfiber cloth

How to Clean Properly:

  1. Sweep or vacuum first to remove grit and dust.
  2. Mop with a damp mop—never soaking wet—to prevent oversaturation.
  3. Dry with a soft towel or air mover to avoid water spots.
  4. Re-seal every few years to maintain the warm finish and moisture protection.

Protecting Your Investment

Proper maintenance keeps Saltillo floors glowing for decades. With the right products and care routine, your tile will continue to show off the deep amber tones and handcrafted texture that make it so distinctive.

If your Saltillo tile looks dull, stained, or uneven, professional cleaning and resealing can bring it back to life—safely restoring its color, luster, and durability.

Professional Saltillo Tile Cleaning & Restoration

At Blue Stem Cleaning, we specialize in Saltillo tile cleaning, sealing, and restoration using non-acidic, eco-friendly products. Our team understands how to clean and protect handcrafted clay tile without stripping its character or finish.

Speak with a Professional

Learn how you can save thousands of dollars by restoring your floor.

Call Us:
760-360-4000